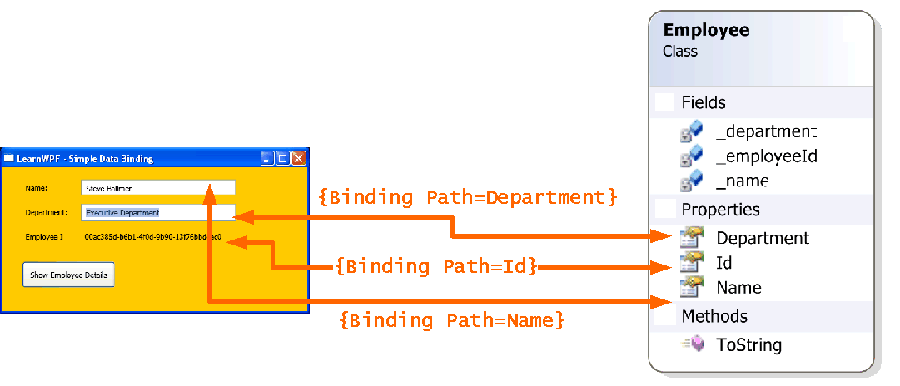
WPFs data binding capabilities prevent developers having to write the brittle, hard-to-maintain code otherwise required to keep changes in the UI synchronized with changes in their own objects. It also handles conversion between an object’s data types and types that can be displayed in our UI. This example will show the most basic kind of data binding – binding text values for simple UI elements to properties of a .NET object. Further examples will cover binding to lists of objects, binding to non-text properties and the like. This example will lay the conceptual foundations for further understanding WPF data binding.
The object we will be binding to is an Employee object and is extremely simple – it has two read/write properties (Name and Department) and a third read-only Id property (a GUID). The UI to display this employee in is equally simple. We have two text boxes to allow the Name and Department properties to be edited, and a third Label control for displaying the ID. All these display fields are labeled accordingly.

In order for us to perform the binding we’re going to need the following things
-
an Employee instance for the UI to bind to (the data)
-
Some way of telling our UI elements to bind to that employee instance
-
Notation for specifying to the UI elements which properties of the employee to display
Creating a new employee instance (#1) is simple – it is just a plain old .NET object, which can be created in any number of ways. The way we point our UI markup (XAML) code to that object instance (#2) is by adding an ObjectDataProvider to our Window’s list of resources. When we define it we give it a key so we can refer to it later. This will be the point of indirection that we will use to plug our Employee object created at run-time into our UI.
<Window.Resources>
<ObjectDataProvider x:Key="employeeData"/>
Once we’ve defined the ObjectDataProvider we still haven’t quite covered off point #2 yet. We’ve created a place where the Employee object can be “provided”, but we still need to tell our text boxes and labels to use that data provider. Now we could go through and connect each control to the data provider but as our Employee object gets more complicated, or we start to want to show data from different objects on a single form this approach breaks down as we have to maintain the same value in many places. It would be desirable if controls that are grouped together on the screen could somehow share a kind of data context, so that each of them pointed to the same underlying data automatically. Fortunately in WPF there is – it is called the DataContext, and it works with the hierarchical nature of WPF element. Child elements automatically inherit the DataContext of their parent element.
In the sample application all the elements we want to display data in are children of the Grid used for controlling the layout, so we will specify the DataContext for the Grid like so:
<Grid DataContext="{StaticResource employeeData}">
The {StaticResource} MarkupExtension looks up the resource we created in the Window.Resources section. It find it using the key we supply, and assigns that to the data context for the grid and its child elements.
The next step is to specify to the UI elements which properties they should display. We do this using another MarkupExtension, the {Binding} markup extension which allows us to specify which properties we want to display using the following syntax:
<TextBox Text="{Binding Path=Name}"/>

This is all that we need to do in the XAML markup to bind the Employee to the various fields on the form. The last thing we need to do is to create an Employee instance in our application code, and associate it with the ObjectDataProvider. This is done in the example using the following VB.NET code (_ceo is an Employee instance we have created):
Dim employeeProvider As ObjectDataProvider = _
CType(FindResource("employeeData"), ObjectDataProvider)
employeeProvider.ObjectInstance = _ceo
In order to verify that changes to the UI were also reflected in the underlying Employee object we’ve also added a button. When clicked the button displays a message box showing the output of the ToString method of the Employee. We overrode the base ToString method to write out the Name, Department and Id for the Employee object.
Hopefully this has shown you how simple WPF data-binding can be. When combined with other features of the platform such as templating it provides a great way to visualize and manipulate your data. Stay tuned for more involved data binding topics.