WPF is a great platform for creating attractive UI. After working with it for some time you may wish to include vector-based graphics in your WPF application, where in the past you might have used icons or a bitmaps. Using vector-based images in your WPF application allows your images to change size in the same way the rest of your WPF application can, without becoming blurry or blocky.
Recently I came across some nice, crisp-looking free vector images created by N.Design Studio in PDF format. I wanted to see how easy it would be to use them in a WPF application. In this article I'm going to describe the process of converting the images to Xaml, and how Xaml vector images can be packaged up for easy re-use. Thanks to the generosity of Nick at N.Design I'll also post all the Xaml source for the images, which can be freely used in your own open-source and commercial WPF applications.
Converting the Images
To embed images as vectors in a WPF application they need to be in Xaml. Currently there are a number utilities and plug-ins available for converting different file formats to Xaml. Most of these are developed by the community, and are at different stages of completeness and currency. As WPF improves in popularity exporting to Xaml from your favorite tool will become easier and more prevalent. I chose to use Mike Swanson'sAdobe Illustrator > Xaml exporter. After installing the Illustrator CS trial version and following the simple install instructions I was able to open the PDFs in illustrator and export them directly to Xaml. Although this conversion was not perfect, it was more than satisfactory for my purposes.
Adding the Images to a Project
I wanted using the images to be as simple as adding a single file to a project, and knowing the names of the individual images. I added all the images as separate resources with their own keys. Use the technique described in this article to include the external resource file in your main application resources.
Using the Images in WPF
To use one of the image resources use the {StaticResource} markup extension, and the name of the image resource. Here is an example that displays an image resource named "Credit-Card" inside a button.
Xaml Code (WPF Beta 2)
<Button Height="75" Width="220" Padding="2">
<StackPanel Orientation="Horizontal">
<ContentControl Template="{StaticResource Credit-Card}" />
<TextBlock FontSize="16" VerticalAlignment="Center" Text="Pay Now!" Margin="3" />
</StackPanel>
</Button>
The button will look like this:

The image resources will resize to fit the available space, and still retain the correct aspect ratio. Here are a number of buttons of different heights with the same image inside them:
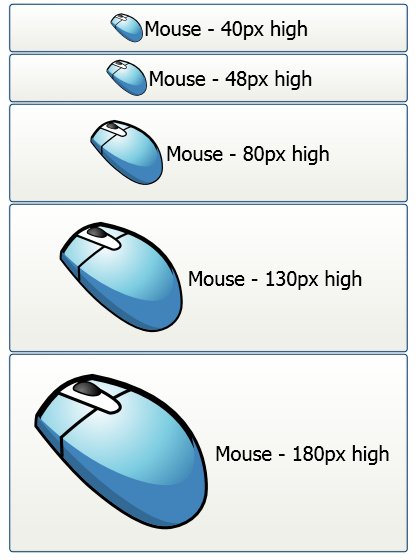
This re-sizing requires no additional code or properties to be set by users of the image, and only minimal effort when creating the resource. To achieve the auto-sizing I nested the "raw" image Xaml (produced by Mike Swanson's converter) inside a Viewbox element with the Stretch attribute set to Uniform:
Xaml Code (WPF Beta 2)
<Viewbox Stretch="Uniform">
... <!-- "raw" Xaml - canvases, paths etc go here -->
</Viewbox>
To allow the image resources to be used multiple times the ViewBox (which allowed the images to resize to fit their container) had to be nested inside a ControlTemplate. Objects which derive from FrameworkElement in WPF must normally have a single parent in the tree of WPF objects. Re-using an object deriving from FrameworkElement without first placing it inside a ControlTemplate would result in an error like the following:
Error in markup file 'somefilename.xaml' : Specified element is already the logical child of another element. Disconnect it first.
ControlTemplate allows you to overcome this problem - it has to so that the templates you define for controls like buttons and list boxes etc to be re-used more than once. This technique is described in Chris Sells and Ian Griffiths excellent book Programming Windows Presentation Foundation - p210. After wrapping everything in a ControlTemplate the overall format of all the resources was like the following:
Xaml Code (WPF Beta 2)
<ControlTemplate x:Key="Resource Name">
<Viewbox Stretch="Uniform">
... <!-- "raw" Xaml - canvases, paths etc go here -->
</Viewbox>
</ControlTemplate>
Here are the images and their names (for easy inclusion in your own WPF projects)
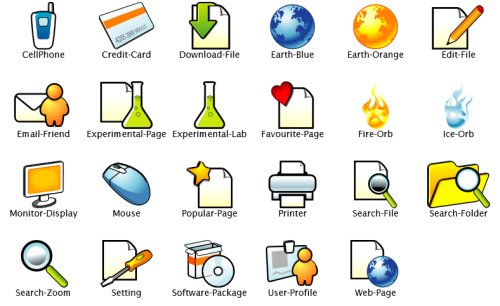
Here is the file containing the Xaml code - you are free to use these images created by N.Design Studio in your own projects (both free and commercial) but you are not permitted to re-distribute the Xaml file.
Comments
vector based image - computer tutorials
How do I use an icon that is a resource in WPF? | Zachry Answers