Although Clickonce applications originally did not have support for file associations, recent releases of the .NET framework and WPF have allowed Clickonce applications to be associated with a file extension, and for your Clickonce application icon to become the icon for that file in the windows shell.
Creating the File Association
The first step is to add an icon file to your project. We’ve chosen a rather garish visual-studio-cum-metro icon (based on this nice infinity icon from the noun project and courtesy of Michael Pangilinan). This is the icon you want files associated with your application to use. The build action of the icon should be ‘Content’
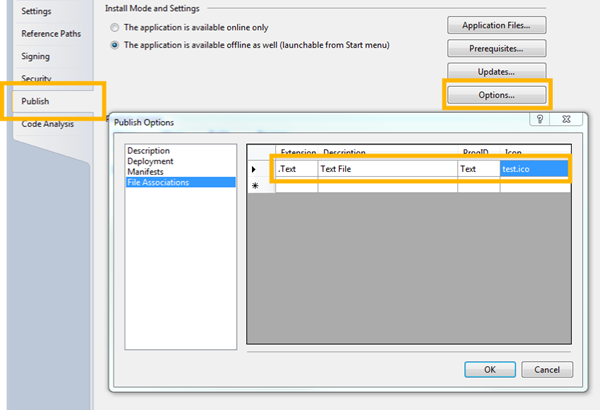
The second step is to configure the file association in Clickonce. This can be done in your application by selecting the project properties, going into the Publish tab (where Clickonce settings are usually set) and choosing ‘Options’ –> ‘File Associations’. Here you enter the extension you want to associate with your Clickonce app, providing a description, and choosing the icon you want to use.
You can also verify at this point that your icon is going to be copied to the Clickonce output as part of your application by choosing ‘Application Files’ and verifying that the icon file is there.
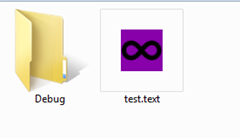
If we publish and install our Clickonce application, and then create a .Text file (the file extension we made up) in an empty directory it should appear with our garish purple visual studio icon, and double-clicking on it should launch our test application.
Opening the File
The next step is to add some code to get access to the file name that is passed to our application. The file is not passed to the app.xaml as an array of strings, like normal command-line arguments. Instead we interrogate the SetupInformation.ActivationArguments.ActivationData property of the current app domain when our application has launched, which will contain the URI to the file.
string[] activationData =
  AppDomain.CurrentDomain.SetupInformation.ActivationArguments.ActivationData;
If the user has launched your app by clicking on an associated file the first element of the activation data will be a file:// URI pointing to the file. Use the Uri.LocalPath property to convert the URI to a traditional windows file path, which you can then read or open as you wish. A sample project showing all of this working is available as part of my LearnWPF Samples Project on BitBucket.
Comments
Associate a file extension with WPF application | Search RounD
Associate a file extension with WPF application | Zellars Answers


Dew Drop – July 9, 2012 (#1,359) | Alvin Ashcraft's Morning Dew