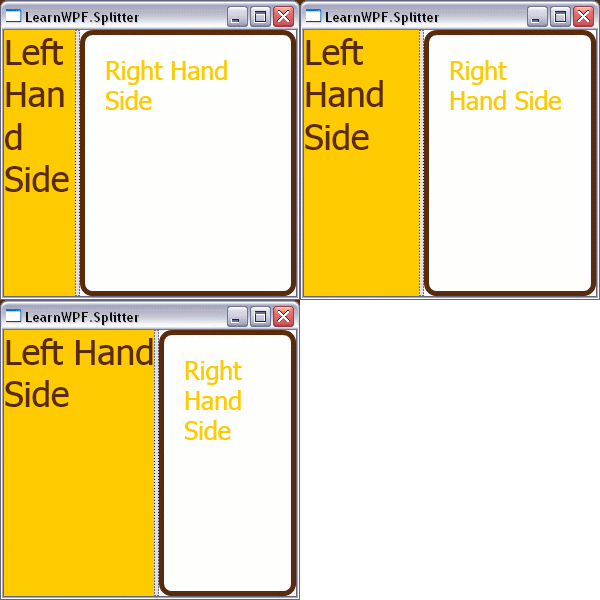
Splitters are a useful UI feature where the width or height of a control on the form can be modified to show more or less information. An Example of this is the splitter between the folder tree-view in and the file and subfolder detail view in Windows Explorer, allowing the size of the folder tree-view on the left-hand side of the form to be sized up to 50% of the form width. Windows Forms 1.1 included a Splitter control, and Windows Forms 2.0 included a SplitContainer. WPF does not have equivalent versions of either of these controls; however it is possible to add splitters to your WPF application using the WPF Grid, and a GridSplitter. The example code below allows the two columns in the grid to be re-sized. This is done by adding a GridSplitter as a child item of the Grid.
Xaml Code (Feb 2006 CTP)
<Window x:Class="LearnWPF.Splitter.Window1"
xmlns="
http://schemas.microsoft.com/winfx/2006/xaml/presentation
"
xmlns:x="
http://schemas.microsoft.com/winfx/2006/xaml
"
Title="LearnWPF.Splitter" Height="300" Width="300"
>
<Grid>
<Grid.ColumnDefinitions>
<ColumnDefinition />
<ColumnDefinition />
</Grid.ColumnDefinitions>
<StackPanel Background="#feca00" Grid.Column="0">
<TextBlock FontSize="35" Foreground="#58290A"
TextWrapping="Wrap">Left Hand Side</TextBlock>
</StackPanel>
<GridSplitter/>
<Border CornerRadius="10" BorderBrush="#58290A"
BorderThickness="5" Grid.Column="1">
<TextBlock FontSize="25" Margin="20" Foreground="#FECA00"
TextWrapping="Wrap">Right Hand Side</TextBlock>
</Border>
</Grid>
</Window>
This gives the following UI behavior:

The splitter appears "docked" on the right edge of the cell that contains it. Like other items contained in a grid, the splitter can be positioned in a column/row other than the first one by setting the Grid.Column and Grid.Row properties. In the above example it defaults to row and column 0 because these have not been explicitly set.
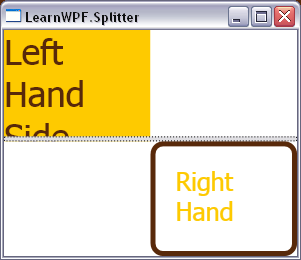
To allow the GridSplitter to resize cells vertically is somewhat non-intuitive as described by Charles Petzold here. The GridSplitter has a ResizeDirection which defaults to Columns but can be set to Rows to allow the splitter to change the height of a row in the grid. To enable the height of row to be resized correctly by the splitter you also need to set the HorizontalAlignment and VerticalAlignment for to align it to the bottom, and across the width of the containing cells. You can also set the Grid.ColumnSpan for the splitter to span across all the cells in the row that it resizes, otherwise the splitter will only fill a single cell.
This example below creates a 2x2 grid of cells, with a splitter spanning both columns and allowing the height of the rows to be changed.
Xaml Code (Feb 2006 CTP)
<Window x:Class="LearnWPF.Splitter.Window1"
xmlns="
http://schemas.microsoft.com/winfx/2006/xaml/presentation
"
xmlns:x="
http://schemas.microsoft.com/winfx/2006/xaml
"
Title="LearnWPF.Splitter" Height="300" Width="300"
>
<Grid>
<Grid.ColumnDefinitions>
<ColumnDefinition />
<ColumnDefinition />
</Grid.ColumnDefinitions>
<Grid.RowDefinitions>
<RowDefinition/>
<RowDefinition />
</Grid.RowDefinitions>
<StackPanel Background="#feca00" Grid.Column="0" Grid.Row="0">
<TextBlock FontSize="35" Foreground="#58290A"
TextWrapping="Wrap">Left Hand Side</TextBlock>
</StackPanel>
<GridSplitter ResizeDirection="Rows"
Grid.ColumnSpan="2"
HorizontalAlignment="Stretch"
VerticalAlignment="Bottom"/>
<Border CornerRadius="10" BorderBrush="#58290A" Grid.Column="1" Grid.Row="1"
BorderThickness="5">
<TextBlock FontSize="25" Margin="20" Foreground="#FECA00"
TextWrapping="Wrap">Right Hand Side</TextBlock>
</Border>
</Grid>
</Window>

»

